Boneyard Voice · Windows

Install & First Run Guide

Follow these steps from the Windows download warning through to a connected Boneyard Voice session inside The Isle.

Windows 10/11Closed beta13 guided steps

Fresh installs can look slightly different

Some screenshots were captured while upgrading an existing Boneyard Voice installation. A first-time install may use slightly different wording, but the buttons and procedure are the same. Fresh website installs always use this visible setup wizard. Later in-app upgrades install quietly after you choose Restart & Update inside Voice Controls.

1

Step 1 of 13

Start the installer

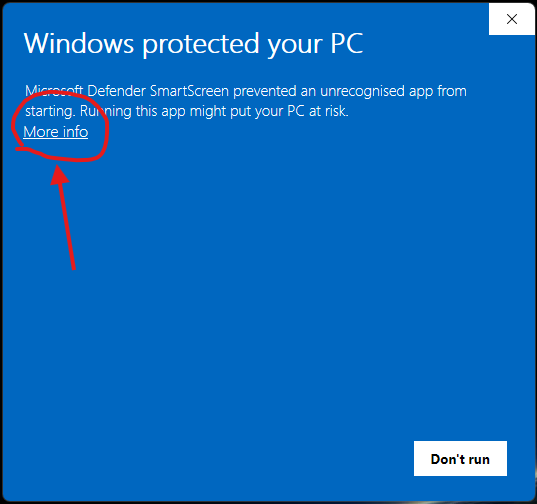
  1. Open the Boneyard Voice installer you downloaded from The Boneyard.
  2. Windows may show “Windows protected your PC”. This SmartScreen warning is expected for the current unsigned beta installer.
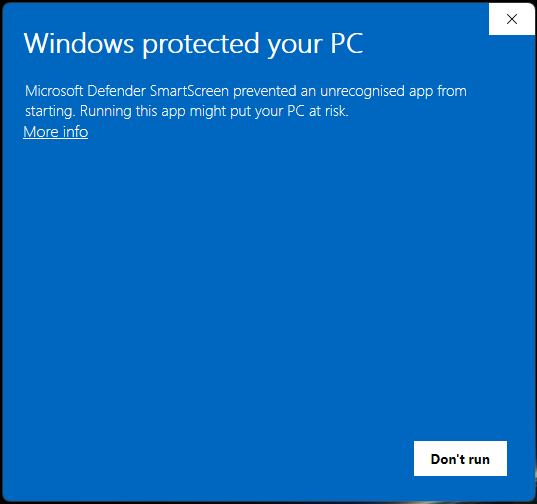
Boneyard Voice setup guide step 1: Start the installer
2

Step 2 of 13

Open the SmartScreen details

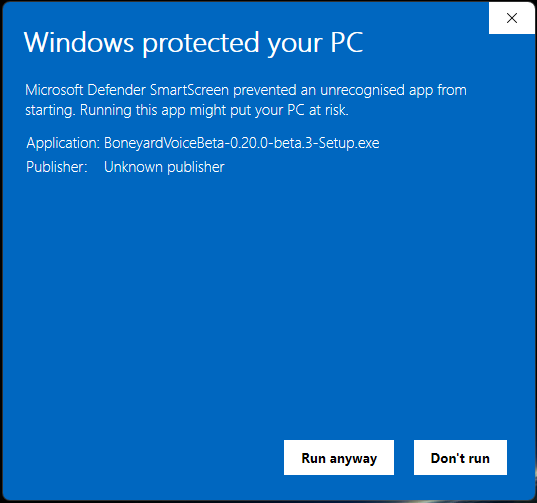
  1. Select More info on the Windows SmartScreen window.
  2. This reveals the installer details and the option to continue.
Boneyard Voice setup guide step 2: Open the SmartScreen details
3

Step 3 of 13

Check the installer name

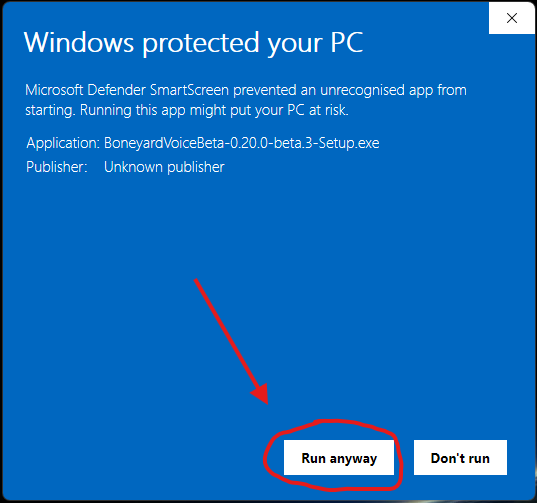
  1. Confirm the application shown is the Boneyard Voice installer you just downloaded.
  2. The exact beta number can change as new releases are published.
Boneyard Voice setup guide step 3: Check the installer name
4

Step 4 of 13

Allow Boneyard Voice to run

  1. Select Run anyway.
  2. The Boneyard Voice setup wizard will now open.
Boneyard Voice setup guide step 4: Allow Boneyard Voice to run
5

Step 5 of 13

Begin Boneyard Voice Setup

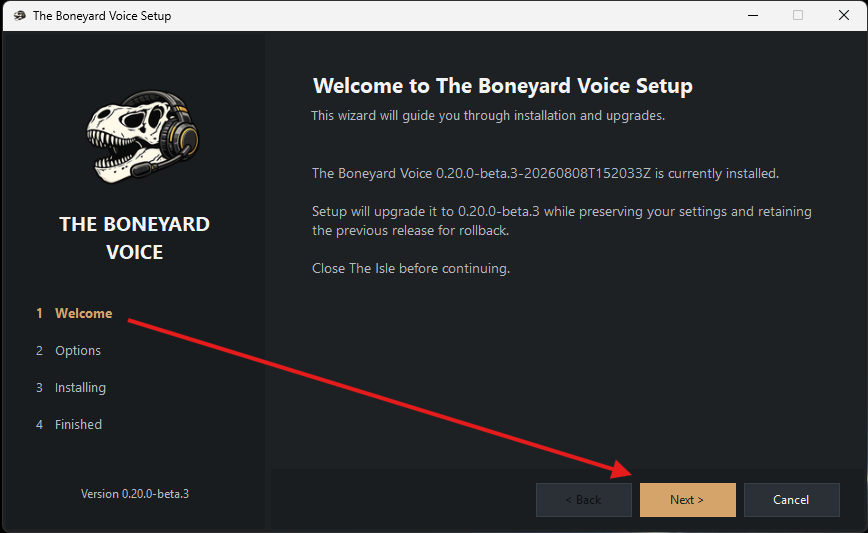
  1. Select Next to continue through the setup wizard.
A brand-new installation may show slightly different wording from this screenshot. This image was taken on a PC that already had an earlier Boneyard Voice build installed.
Boneyard Voice setup guide step 5: Begin Boneyard Voice Setup
6

Step 6 of 13

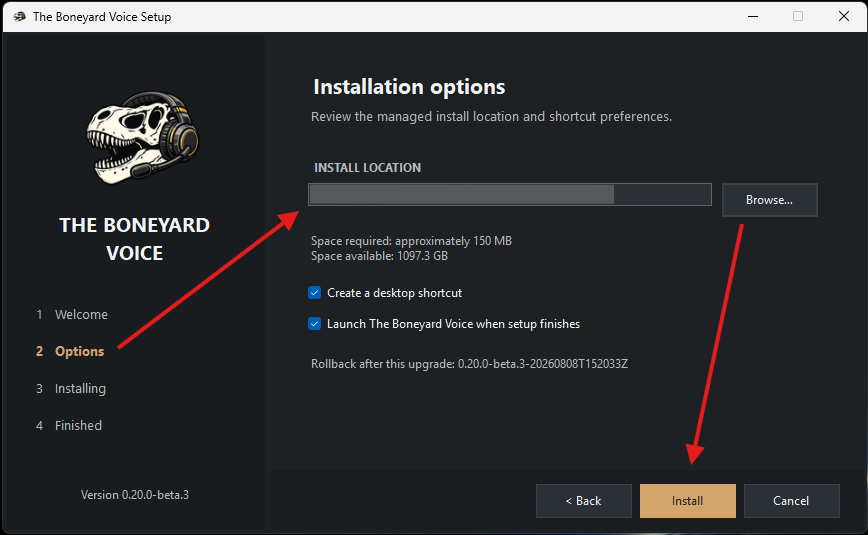
Leave the normal install options selected

  1. For a normal installation, leave the default install location and options unchanged.
  2. Select Install.
Boneyard Voice setup guide step 6: Leave the normal install options selected
7

Step 7 of 13

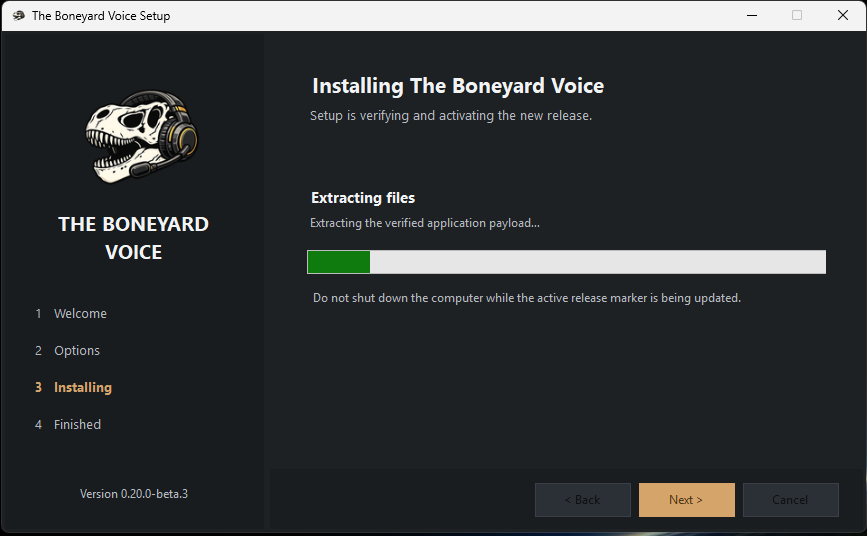
Let the installation finish

  1. Wait while Boneyard Voice copies and installs its files.
  2. Do not close the setup window while installation is in progress.
Boneyard Voice setup guide step 7: Let the installation finish
8

Step 8 of 13

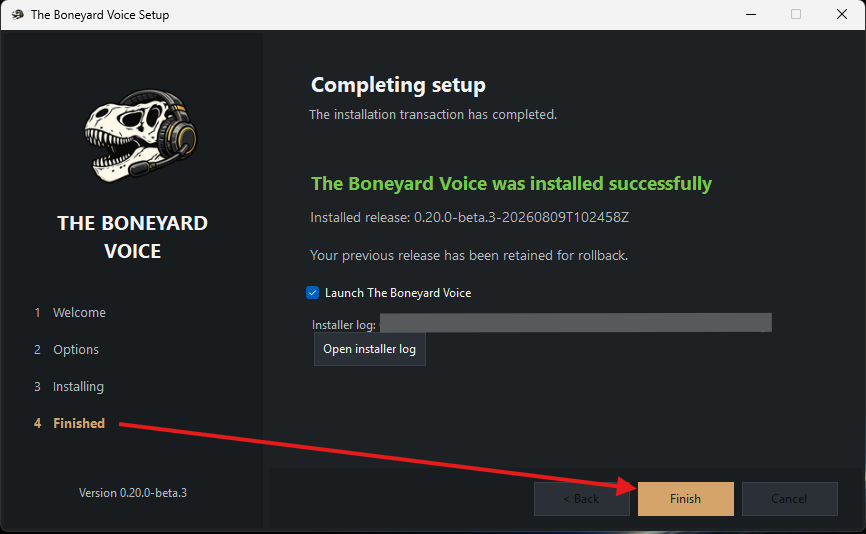
Finish and launch Boneyard Voice

  1. Leave Launch The Boneyard Voice selected.
  2. Select Finish.
If the installer mentions retaining an earlier release for rollback, that is normal on an upgrade. A fresh installation may not show the same wording.
Boneyard Voice setup guide step 8: Finish and launch Boneyard Voice
9

Step 9 of 13

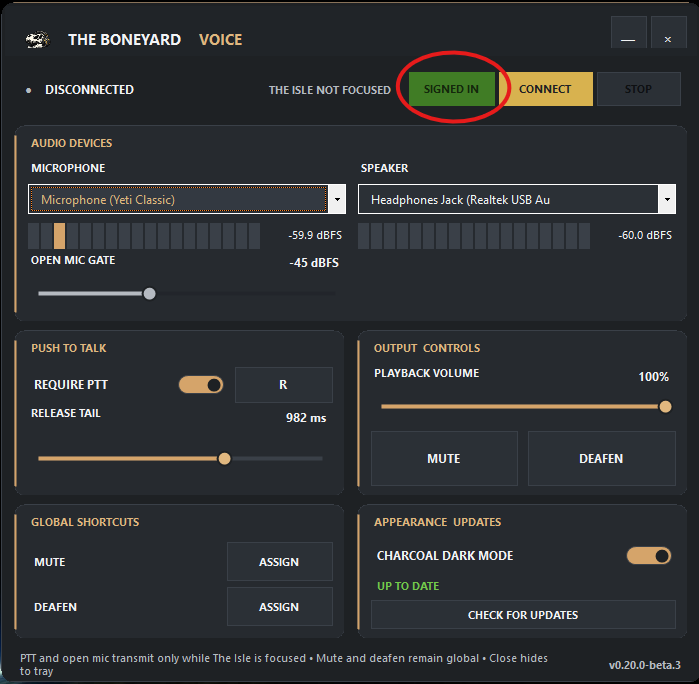
Voice Controls opens automatically

  1. After you select Finish with Launch The Boneyard Voice enabled, Voice Controls opens automatically and appears on the Windows taskbar.
  2. On a normal later launch, Voice Controls opens the same way.
  3. On your first run, choose Sign In. Your browser will open so you can complete Steam authentication, just as you did when first signing into The Boneyard website.
  4. Return to Boneyard Voice after Steam authentication completes, then select the microphone you want to speak through and the speaker or headset you want Boneyard Voice to use.
This screenshot was taken on an already authenticated PC, so it shows SIGNED IN rather than the first-time Sign In button. The tray icon remains available. By default, minimizing keeps Voice Controls on the taskbar; enable Minimize to system tray in Voice Controls if you prefer tray-only minimizing.
Boneyard Voice setup guide step 9: Voice Controls opens automatically
10

Step 10 of 13

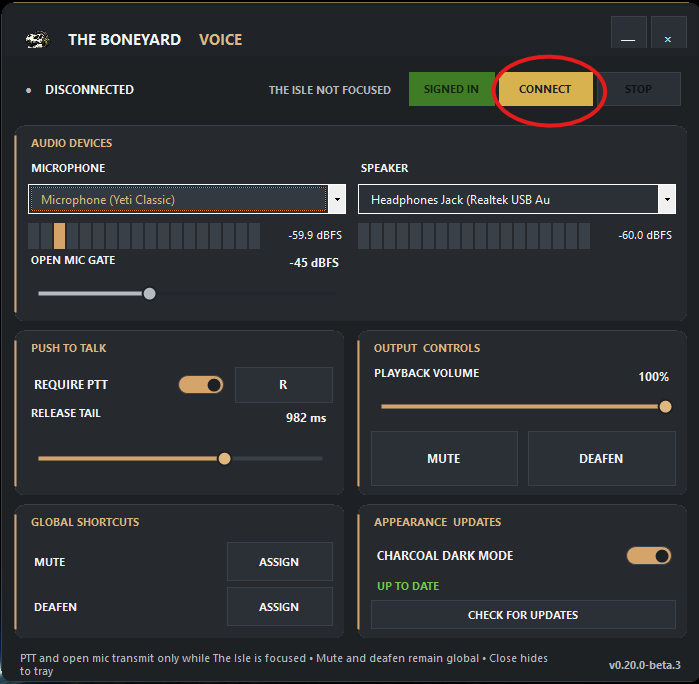
Connect to Boneyard Voice

  1. Once you are signed in and your audio devices are correct, select CONNECT.
Boneyard Voice setup guide step 10: Connect to Boneyard Voice
11

Step 11 of 13

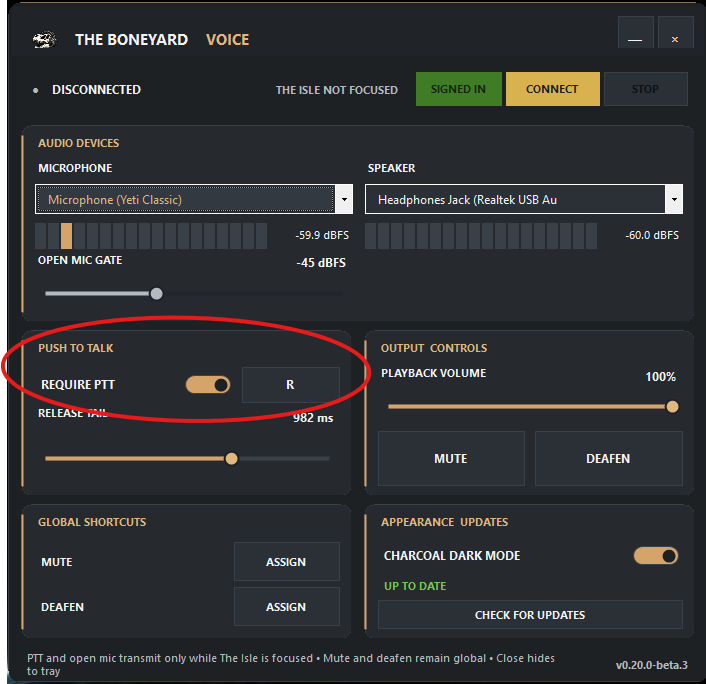
Choose your Push To Talk key

  1. Enable Require PTT if you want Push To Talk.
  2. Select the key-binding control and press the key you want to use while speaking.
The R key shown in this screenshot is only the test PC binding. Choose whichever key works best for you.
Boneyard Voice setup guide step 11: Choose your Push To Talk key
12

Step 12 of 13

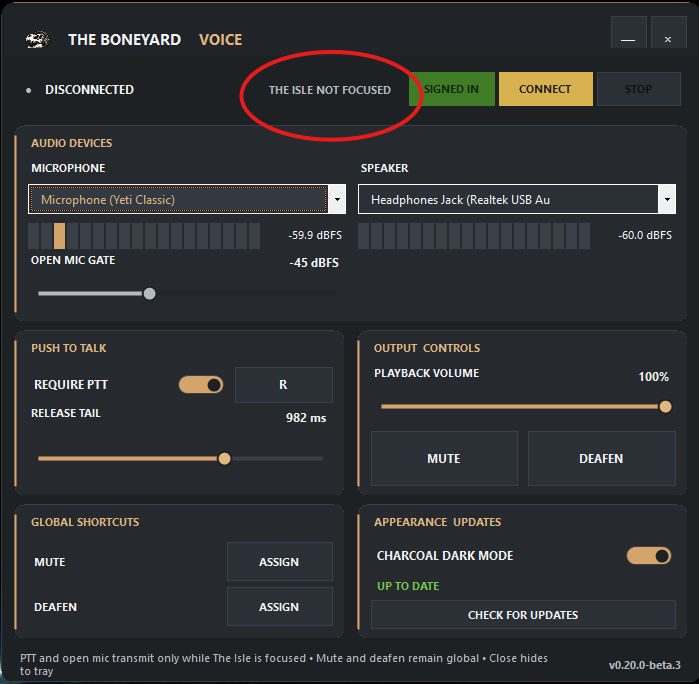
The Isle not focused is expected outside the game

  1. If Boneyard Voice says THE ISLE NOT FOCUSED while you are looking at the desktop, browser or Voice Controls window, nothing is wrong.
  2. Bring The Isle back to the foreground.
Boneyard Voice deliberately gates player transmission to the active The Isle game window.
Boneyard Voice setup guide step 12: The Isle not focused is expected outside the game
13

Step 13 of 13

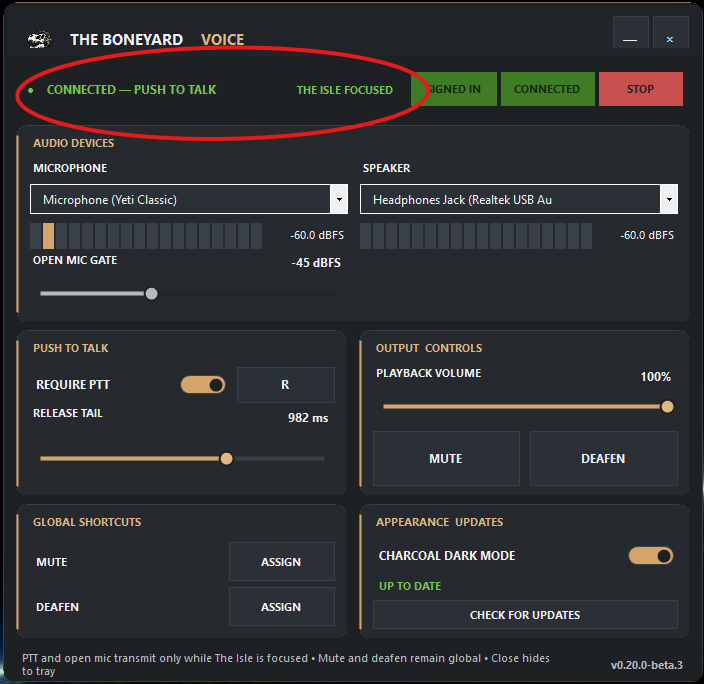
Confirm the ready state

  1. With The Isle open and focused, Boneyard Voice should show CONNECTED and THE ISLE FOCUSED.
  2. If Push To Talk is enabled, hold your chosen PTT key when you want to speak.
If you can see CONNECTED and THE ISLE FOCUSED, your first-run setup is complete.
Boneyard Voice setup guide step 13: Confirm the ready state

Ready check

You are ready when Voice says connected and The Isle focused

If either state is missing, re-check your Steam sign-in, selected microphone and speaker, connection state, and whether The Isle is currently the foreground window.